Experimenting with zines (1)
It all started when I was trying to learn how to sketchnote (see previous post). Malwine sent me a zine (“The Cycle”) and a mini-zine (“Little guide to sketchnoting”). Both were inspiring in different ways!
“The Cycle” made me realise how (health) information can easily be shared using this medium and the “Little guide to sketchnoting” (on top of being useful content) I found amazing the folding of an A4 sheet into a mini-zine.
This was all reinforced when I visited the “1, 2, 3 DATA” exhibition back in May (see same previous post) and the bibliography section of the exhibition contained a really cool zine publication dedicated to data visualisation, Market Cafe Mag!
In conclusion, I find the combination of data visualisation and the print medium makes so much sense and is something I want to get into :)
Folding a (mini)zine
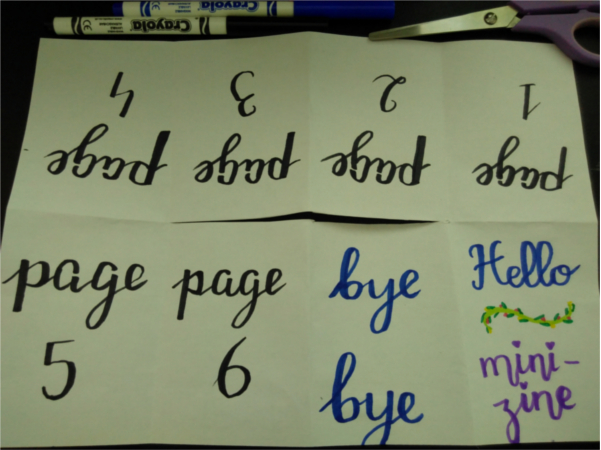
The first step was to learn how to fold a zine and I used this wiki.
You only need a sheet of paper and a pair of scisors. Obviously the larger the sheet of paper, the larger the zine. I like mini-zines and only have A4 sheets available, so here’s what I went for:
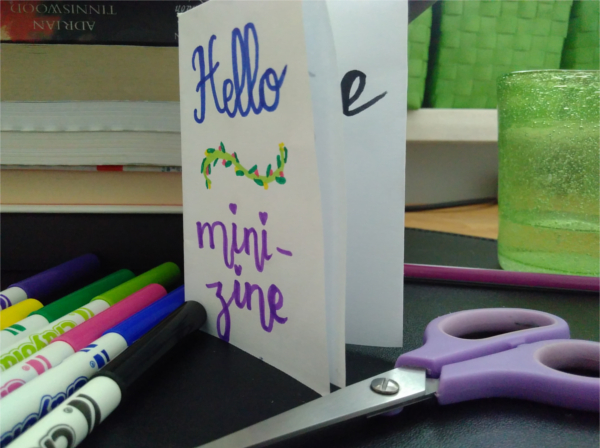
It’s different from other projects in the fact that the pages aren’t in order and you’ll need to fold it to see your progress and how it’s all coming together.
Designing the content
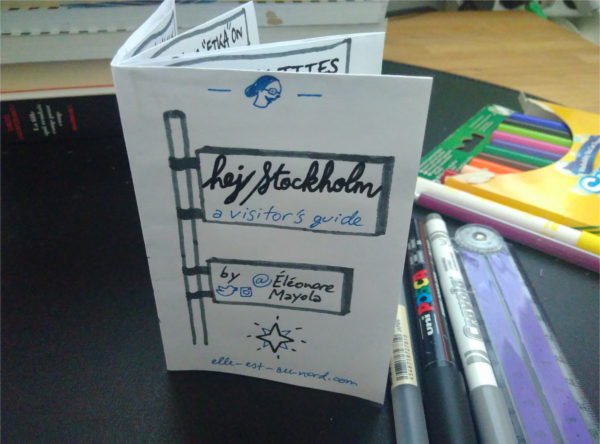
I already had a simple idea for a first zine and that was sharing tips for visitors to Stockholm! I moved to Stockholm, Sweden almost a year ago and since then friends and acquaintances ask me advices on what to do/see when coming to Stockholm for a few days.
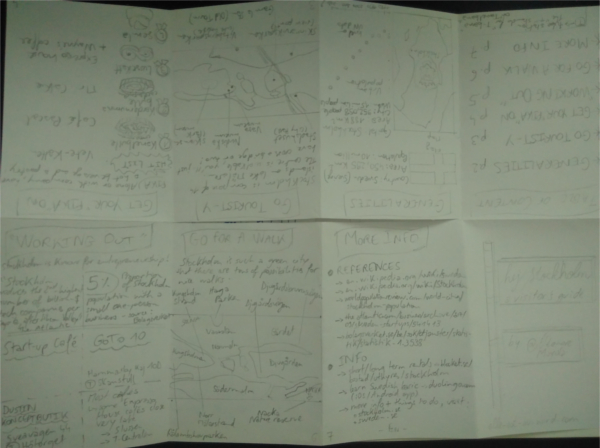
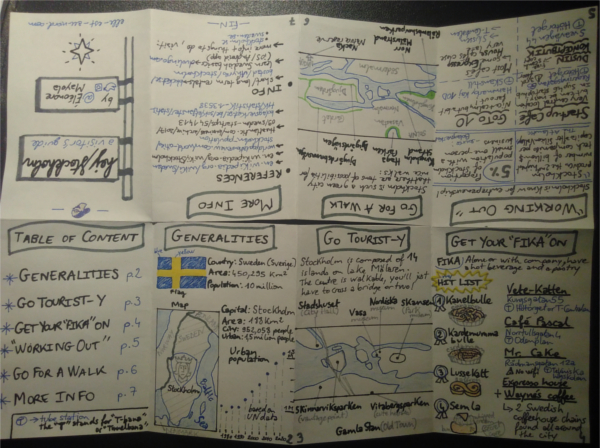
I wasn’t sure how much information could fit in one zine page, but I made this plan which I ended up staying very close to during the execution phase:
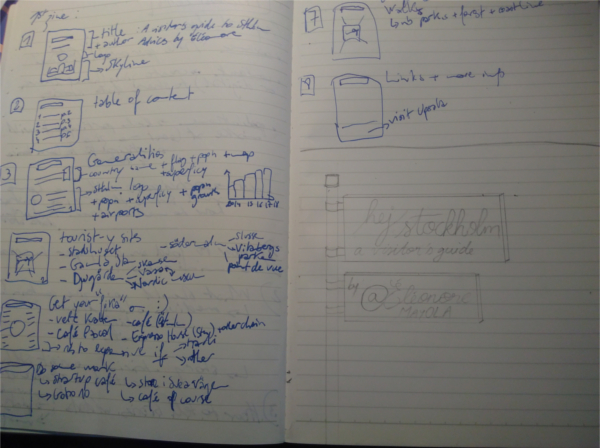
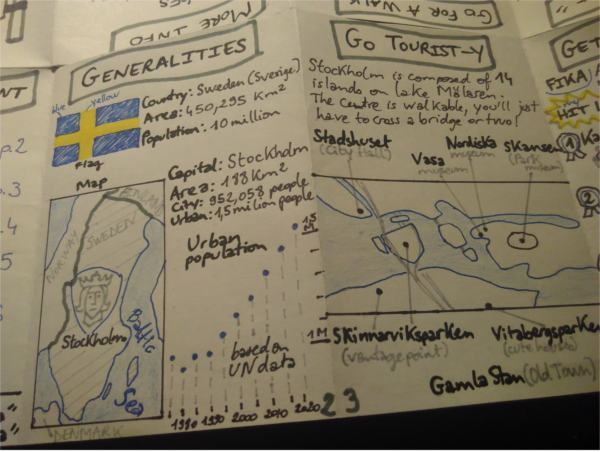
I somehow thought a table of content to be useful, and I planned what data visualisation or illustration i wanted to have for which subject. Here I have a plot to represent the evolution of the population of Stockholm over time and show the city is growing. When mentioning places I thought maps where indispensable. So I added (hand drawn) maps; one for Sweden and two for Stockholm. Hand drawn maps are obviously approximative, but I think they’re informative enough in that case. The last bit is a more detailed design of the cover.
Once I knew what the content would be, it was time to actually create the zine!
Time for execution
I wish one day I’ll be able to directly draw with markers, but this time I wrote and drew it all using a carbon pencil.
I got this:
The good thing with carbon pencil is obviously the possibility to change and correct until you’re satisfied. I was unsure of wether I had added too much information, but I still decided to go forward with the markers step!
At this step I thought that I didn’t need colours because I was certainly going to copy it in black and white later. I planned to use a thin tip black marker and a grey coloured marker (that would look lighter even in black and white copies).
In the end I couldn’t resist adding a bit of colours (especially for the Swedish flag) and I also realised my thin tip marker didn’t have such a thin tip after all. So I used a fine tip (0.5 mm) blue marker from Muji and for black text I ended up buying two new fine tip markers (0.4 mm) by Stabilo.
Below is the final result.
The front cover:
The whole thing:
And my favourite bits :)
A scatter plot and maps:
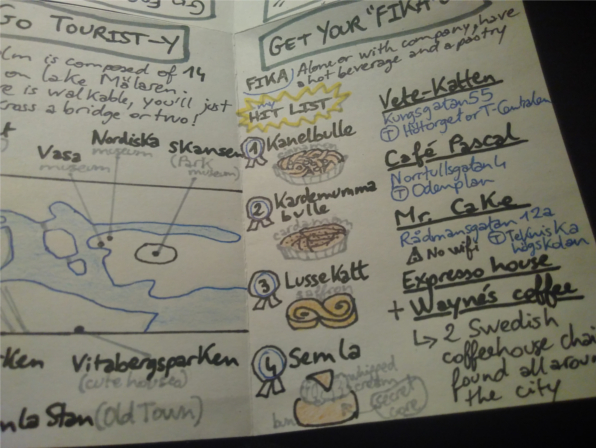
Yummy pastries:
My take away
The whole process took me roughly two days to complete! Depending on the level of details and quantity of information you wish to add, your zine could take you much less or way more time.
For a first try I’d advise to start with a less detailed zine, maybe limit yourself to one plot, one map and one illustration. Especially if you tend to be impatient, a perfectionist or an impatient perfectionist like me :-/ .
I haven’t had access to a working copy machine (yet) to see what it looks like in black and white. But so far I’m really pleased with how it turned out :D
Stay tuned for my attempt at a “digital” (as in not hand drawn) zine!
Resources
- Previous post mentioned in this post: Visualising a data viz conference
- Market Cafe Mag: zine store - twitter - instagram
- zine folding: wikihow.com/Make-a-Zine